A simple Optin form can be the difference between a fleeting visitor and a loyal customer.
Simply obtaining site visitors is not sufficient for business success. To convert random site visitors into passionate clients you require conversion-driving approaches which guide prospects into client status. The application of lead magnet Optin forms is what comes into the role.
All forms have different levels of effectiveness since they do not function equally. Poorly designed Optin forms together with those positioned in inconvenient locations will allow prospects to escape your lead base. A lead magnet form that impresses prospects during their first interaction will help you establish trust while developing relationships that produce successful deals. So, whether you’re offering a free trial, a whitepaper, or an exclusive demo, here is the key to unlocking the leads you’ve been missing.
Ready to see your conversions skyrocket? Let’s get started!
Top 6 Benefits of Having a Lead Magnet Optin Form on Your WordPress Site
If you’re still on the fence about whether a lead magnet Optin form is right for your WordPress site, let’s break down the real benefits—because this isn’t just about collecting emails.
1. Capture Quality Leads Who Are Actually Interested
When you offer something valuable in exchange for someone’s email (like a free trial, eBook, or exclusive demo), you’re not just collecting random email addresses. You’re attracting leads who are genuinely interested in what your software can do. This means the leads you gather are more likely to convert into paying clients.
2. Build a Trusting Relationship with Your Audience
A lead magnet Optin form isn’t just a way to collect emails—it’s a way to start a conversation. By offering something of value upfront, you’re demonstrating that you’re not just interested in making a sale but in providing meaningful value. This builds trust from the get-go.
3. Nurture Leads with Automated Follow-Ups
One of the most powerful benefits of having a lead magnet Optin form is the ability to automate your lead nurturing. Once someone subscribes, you can set up an email sequence that guides them through the journey from visitor to customer.
4. Improve Conversion Rates and ROI
Once your form is set up and integrated with your email service provider, it practically runs itself. No more chasing down leads manually or relying on costly ad campaigns to generate interest. With an automated Optin form, you can continue growing your list, increasing conversions, and improving ROI—without lifting a finger.
5. Gain Valuable Insights into Your Audience
Your WordPress Optin form isn’t just a tool for collecting leads; it’s also a treasure trove of insights. By analyzing who is signing up, where they’re coming from, and what offers resonate the most, you can better understand your audience’s preferences and pain points.
6. Scale Your Business with a Growing Email List
With a lead magnet Optin form, you’re constantly growing this list with targeted, engaged leads who want to hear from you. As your list grows, so do your opportunities to nurture relationships, share updates, and upsell to existing customers. A well-maintained email list also gives you the chance to promote new features, upgrades, or special offers.
Easy Steps to Create a Lead Magnet Optin Form for Your WordPress Website
Creating a high-converting lead magnet Optin form for your WordPress site doesn’t have to be complicated. Whether you’re a WordPress pro or a beginner, there are several ways to get your form up and running.
- Choose your Email marketing platform
- Select a WordPress plugin for Optin forms
- Create a lead magnet
- Design your Optin form
- Setup an Email marketing integration
- Set display rules and targeting options
- Create a thank-You page or confirmation message
- Test and optimize your form
Here’s a simple, step-by-step guide to help you create a form that attracts and converts visitors into valuable leads.
1. Choose Your Email Marketing Platform
Before you get started, you need an email marketing provider to store and manage your leads. Some of the most popular options include:
Mailchimp
ConvertKit
ActiveCampaign
Most of these platforms offer integration with WordPress plugins, making the process easier. Choose the platform that best suits your business needs and sign up for an account.
2. Select a WordPress Plugin for Optin Forms
Now that you’ve picked your email provider, it’s time to select a plugin to build and manage your Optin forms. There are several excellent WordPress plugins available, and the choice depends on your needs. Choose a plugin that fits your level of expertise and offers the features you need. Some popular ones include:
| OptinMonster | Great for creating popups, slide-ins, and inline forms. Offers advanced targeting and A/B testing features. |
|---|---|
| WPForms | An easy-to-use drag-and-drop form builder that integrates with email marketing services. |
| MailOptin | Powerful for building Optin forms and automating email campaigns. |
3. Create a Lead Magnet
This step is crucial—create a lead magnet that needs to be enticing enough for visitors to exchange their email addresses. Make sure you create a lead magnet that addresses a specific pain point your audience faces and is relevant to your software. A lead magnet could be:
- A free trial or demo of your software
- An eBook or whitepaper with valuable insights
- Case studies showing how your product solves specific business problems
- A checklist or template for potential customers
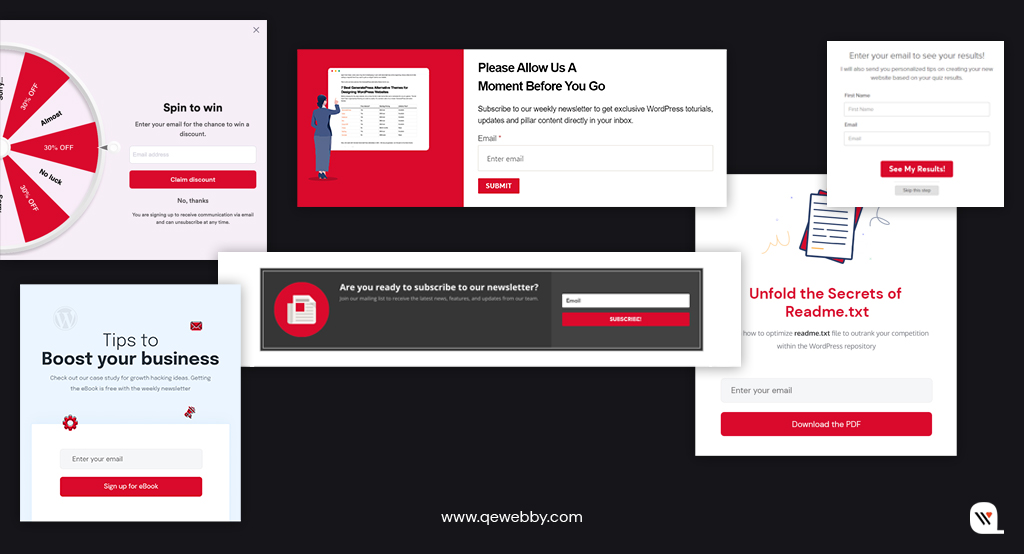
4. Design Your Optin Form
Once your plugin is installed and activated, it’s time to design your Optin form. Most plugins allow you to easily customize the design, so take advantage of that to make the form look professional and inviting. Here are some tips:
- Keep it simple: Only ask for essential information—usually just name and email.
- Be clear: Use a compelling headline that explains the value of the lead magnet. For example: “Get Our Free 30-Day Trial Now!”
- Use a strong call-to-action (CTA): Make it action-oriented like “Download Now” or “Claim Your Free Trial.”
- Match your branding: Ensure your form’s colors, fonts, and images align with your website’s look and feel.
5. Set Up Email Marketing Integration
After designing your Optin form, you need to connect it with your email marketing service. This will ensure that when someone submits the form, their email is added to your list and they get the promised lead magnet. Now, when someone subscribes to your Optin form, they’ll be automatically added to your list and sent the lead magnet. Here’s how to do it:
- Go to your plugin settings and find the Email Integration section.
- Enter the necessary API key or credentials from your email marketing service (Mailchimp, ConvertKit, etc.).
- Map the form fields (like Name, Email) to your email service’s fields to ensure everything syncs correctly.
6. Set Display Rules and Targeting Options
The next step is deciding when and where your Optin form will appear on your site. Display rules help ensure your form is shown at the right time, maximizing conversions. Most plugins allow you to easily set these triggers to optimize your form’s visibility. Here are a few options to consider:
| Exit-intent popups | Shows the form when the user is about to leave your page. |
|---|---|
| Time-based triggers | Display the form after the visitor has spent a certain amount of time on your page. |
| Scroll-based triggers | Show the form after the visitor scrolls a certain percentage of the page. |
| Page-specific targeting | Show the form only on specific pages, such as your pricing or demo page. |
7. Create a Thank-You Page or Confirmation Message
Once a visitor submits their information, you want to thank them and guide them to the next step. Make sure your thank-you page or message is clear and directs them to the next action. You can either:
- Redirect them to a thank-you page: This page can include a download link for your lead magnet, access to a trial, or even a CTA to schedule a demo.
- Show a thank-you message: If you prefer, you can display a message on the same page thanking them and providing access to the lead magnet.
8. Test and Optimize Your Form
Before going live, it’s important to test your form. Most plugins offer built-in A/B testing tools, so you can compare different versions of your form to find the most effective one:
- Check the design: Ensure it looks good on both desktop and mobile devices.
- Test functionality: Make sure the form is submitted correctly and integrates seamlessly with your email provider.
- Optimize for performance: Use A/B testing to try different headlines, CTAs, and form placements. Track your conversion rates to see which versions perform best.
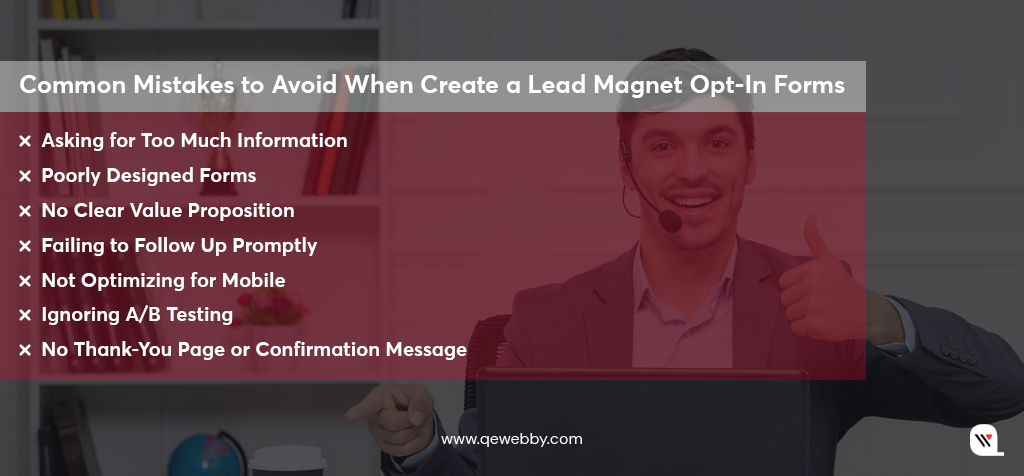
Common Mistakes to Avoid When Create a Lead Magnet Optin Forms
While you create a lead magnet Optin form while custom wordpress development is an exciting step, it’s easy to make a few mistakes that can hinder its performance. Here are some common pitfalls to avoid to ensure your Optin form is both effective and efficient:
1. Asking for Too Much Information
One of the biggest mistakes is requesting too much information upfront. Keep it simple! The more fields you have, the less likely visitors will be to fill out your form. Stick to the basics: name and email. Only ask for additional details (like company name or phone number) if absolutely necessary.
2. Poorly Designed Forms
An unappealing form can turn visitors away. Avoid clutter and make sure your design aligns with your website’s branding. Your form should be easy to read, visually appealing, and mobile-friendly. A clear, compelling CTA and a well-placed form can make all the difference.
3. No Clear Value Proposition
If your lead magnet doesn’t immediately communicate its value, visitors won’t bother signing up. Make sure your form clearly explains what they’ll get and why it’s worth their time. Use attention-grabbing copy and highlight the benefits of your offer, whether it’s a free trial, an eBook, or an exclusive resource.
4. Failing to Follow Up Promptly
Once someone subscribes, don’t leave them hanging. If they’ve signed up for a free trial or resource, make sure to send the promised content immediately. Set up automated follow-up emails to engage them right away and keep them interested.
5. Not Optimizing for Mobile
More than half of web traffic comes from mobile devices, so if your Optin form isn’t optimized for mobile, you’re losing potential leads. Test your form across different devices to ensure it looks great and functions smoothly on smartphones and tablets.
6. Ignoring A/B Testing
Don’t just set it and forget it. Regularly A/B test your Optin forms to see what works best. Experiment with different headlines, CTA buttons, and form placements to optimize your conversion rate.
7. No Thank-You Page or Confirmation Message
Always provide a clear next step after someone submits the form. A thank-you page or confirmation message reassures users that their submission was successful. This also gives you an opportunity to guide them to further actions, like checking their email or scheduling a demo.
In a Nutshell
Your WordPress Optin form is more than just a tool—it’s your digital handshake with potential clients. By offering valuable content in exchange for their information, you’re not only growing your email list but also building trust and credibility. With the right strategy and ongoing optimization, your Optin form can be the driving force behind your lead generation efforts. Our custom WordPress development services are here to assist with plugin setup, form design, and optimization—so you can focus on what matters most: growing your software business.